Building a custom guitar, part V: some assembly required
(Brian Johnston | Posted 2011-08-09)

Editor's note: This is the fifth of a series by Brian Johnston about having a custom guitar made. The first three articles looked at how and why Brian chose luthier Stephen Casper to build his instrument, along with detailing how they made design s decisions. This week's installment further explores the progress toward finished instrument. Links to the first four installments appear at the bottom of this article.
In about four weeks my creation will be making its journey from Florida, where Casper Guitar Technologies is located, to Ontario, Canada. Recently Stephen sanded the body and applied the first coat of sealer to the wood, which he lets dry for two days before sanding and re-sealing. This is a time-consuming process since it will be a clear finish, which means being unable to use wood filler to seal the body or to cover any imperfections in the wood. This process requires time and patience to get it right, but were good on the schedule anyway, and so no problems in that regard, he stated.
The neck is 50% complete, including the neck contour and final fitting, and Stephen will be inserting the frets and dot inlays this week (almost completed at the time of writing this). He applied one coat of lacquer to the entire neck, and from this point he will apply the ID on the back of the headstock (his company logo and serial number of the guitar). Once done Stephen then will apply two more coats of lacquer then wet sand to a nice semi-gloss finish.
 Speaking of logos, Stephen has the capability to create a water-slide of any computer graphic, and then transfer it onto the guitar. Once he applies top lacquer the logo remains embedded forever. Because this guitar is one-of-a-kind, and because it is my signature axe, I had Stephen create a logo that will be placed on the body of the guitar, along the top horn, reading BDJ Signature Guitar (enclosed in a circle). Talk about custom finishing touches!
The frets are 6130 Low/Jumbo Nickel Frets - .036 X .106. I wanted something lower to the fretboard as this will give me extremely low action and almost endless fret life, thanks to Stephens recommendation. He also noted that the additional width of the frets gives more material at the crown, which means longer fret life and longer between re-crowning.
 The Schaller Bridge and Upgrade Block arrived last week as well. We picked the bridge type since we both feel they are the best developed relative to my needs, but I was not aware of the upgrade block. Stephen explained: I do the upgrade not only because of the additional sustain these things provide, but due to the fact that my bodies are routed in such a way that a standard 42mm block would protrude from the back of the guitar by about 5mm. This is not acceptable so I reduce the length of the block while increasing the mass, thus adding mass and sustain. The blocks are milled from single blocks of AAAA Bell Brass and really ring when installed as a tremolo block, and Stephen highly recommends the upgrade to any Floyd Rose or Schaller tremolo. Apparently those blocks are incredible, and so I cannot wait to try out this guitar!
The other hardware, including tuners, has been ordered and is on its way. About the only things left are the pickup installation (waiting on the Shadow Electronics E-Tuner mechanism) and the curing assembly process, which Stephen describes as boring and uneventful, like watching paint dry. As the finish cures, hell be completing the hardware acquisitions and will document them for me as well.
A few other finishing touches include Dunlop Strap-Locks and rosewood volume/tone knobs. I decided on adding wood knobs since the guitar will have a natural finish and I thought wood knobs would add to the customized appearance. 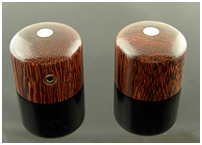
To provide contrast in the woods (the body is a light swamp ash), Im matching the knobs to the rosewood fretboard. These need to be the screw-on type so they can be fastened and sealed to prevent falling off. Stephen recommended the screw-ons since the press-on types can fall off due to wood expanding in climates that see extreme weather changes (from cold/snow to hot/humid), which expansion usually occurs over the initial 6-8 month period. Besides, my electronics involve a push-pull potentiometer system and it sometimes doesnt take much for knobs to pop off at the most inopportune times.
Part I
Part II
Part III
Part IV
