Locating the Microphones
Since you are making a live recording of an entire group of musicians and/or singers, then the microphone recording location should be far enough away to get the entire mix of sounds without a single instrument or voice drowning out the rest. The concert producer should have made the appropriate arrangements for any sound reinforcement to ensure that the audience hears the right balance, although on occasion this may not happen - typically a soloist is too quiet against the accompaniment. Don't worry too much if the balance is not quite right as there are post processing techniques to address this problem.
Every room, especially large ones, has a sweet spot, where all the sounds reverberate just right. Walking around the room with headphones fully covering the ears and a single point stereo microphone plugged into your portable MD recorder during a rehearsal will help you find the room's sweet spot.
If the ideal recording position is right in the middle of the audience seating area, you have two options. Either sit in the ideal listening position with the MD recorder on your knee (and a single point stereo microphone) or put the microphones high up on a tall pole to clear the audience rustles and coughs. My budget microphone pole is actually the 1/2" diameter poles from two living room stands screwed together to clear 7 feet using one of the original light stands as a base! I then use a 20 foot extension cable bought from the Sound Professional guy (above) to run to my MD recorder. I don't bother putting on my headphones (looks geeky, and hard to do while performing!) but just keep an eye on the MD recorder level meter. Remember also the Sharp MD recorder input level compression is very good at handling peaks.
Step Two - The Post Processing Mix
So you've got home and listened to the live recording. You should be amazed at the recorder's stereo clarity, if it is your first time. However there are some things you can do to "polish up" before burning a CD, this step is called post processing.
Transfer to PC Hardrive
The absolute best way to post process to transfer from the MD player to the PC over a fiber optic cable. Most portable MD recorders cannot do this. In my early days I used the recorder's analog output to my sound card's line input. This would give me a noise floor of about -59 dB, which you can hear as a very quiet hiss under normal listening levels. Later on I invested in a Sharp home MD/CD deck with fiber optic output (because it was on sale for $130) from Minidisco (above). This drops the noise floor to -90 dB, a very respectable number for amateur recording.
The second advantage of using a fiber optic cable is that there is no sound card input gain to adjust. If you are using the analog method, find which setting avoids any overload of the sound card's analog input. Don't bother maximizing the sound level track by track, that can be taken care of in the post-processing mix.
Where can you buy a cost effective sound card with fiber optic inputs? I bought a DiO 2448 for $110 at www.soundprofessionals.com (I should really get a discount for free advertising!) and run it at the same time as my SoundBlaster, which is used for output to my studio amps.
There are many programs available for transferring your MD recording to hard drive. My favorite is N-Track Studio, since it has input VU metering and live monitoring while recording.
Even though the MD recorder has editing facilities, don't use them on your precious live recording MD! One mistake can ruin every thing (if you do, eject the battery so the recorder cannot write the changes back to the disc). An easier way is to use the PC program to create a WAV file which a bit extra at the start and end, you can always trim and fade later in the post mixing step.
The Post Mix
Without a doubt, the absolute best program for post-processing live recording WAV files is Syntrillium's Cool Edit Pro. It is worth every penny of its $399 price. The DEMO version lets you do anything but save for 30 minutes. Failing that Cool Edit 2000 1.1 (with preview) for $69 from the same company is a good alternate.
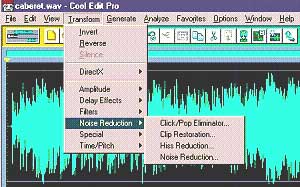
Cool Edit Pro's Effects Menu
The post-processing sequence (described in detail later) is as follows, with some steps avoided for certain recordings.
1. Remove "bad" sound artifacts
2. Tone down any overbearing voices or instruments
3. Use dynamic processing for a better balance between instruments and voices
4. Apply any extra room reverb
5 Rebalance left and right to widen or narrow the stereo image
6 Normalize the maximum sound level to about 85% of maximum.
7. Trim the start and end of the track.
8. Save the new file as a separate file from the original
RULE #1 - Your ears can easily get used to overdone effects. Too much filtering can "dull" the sound, too much reverb makes for unnatural echo, too much compression can give the sound a "squeezed" feel. Take frequent breaks and go back to the original MD track to reset your ears to the original recording.
RULE #2 - Filtering effects should first be used to REMOVE unwanted information rather than boost other parts
1) Remove Sound Artifacts
Sound artifacts are basically impairments ending up in the live recording. The Minidisc's ADTRAC compression process adds some very slight high frequency scratching around 8.7 kHz when the music program has a lot of sonic energy (e.g.. a majestic church organ). To eliminate this artifact, you use the sound editor's parametric equalizer to create a narrow -12dB notch (Q = 18). Sweep the filter to find exactly where the artifact is and click the filter in and out in preview mode to make sure you are not compromising the recording. Once the preset has been saved, just use it for every MD track.
Cool Edit Pro has a good Hiss Reduction effect. If possible, select a short portion of a recording with no music and adjust just enough to lower to an acceptable level. Listen carefully to other parts of the track to verify no dullness or warble has been added by Hiss Reduction. Cool Edit Pro remembers the Hiss Reduction setting for subsequent tracks.
2) Tone down any overbearing voices or instruments
Sometimes the level of bass or percussion can be a little overbearing. I normally use the Parametric Equalizer to adjust the levels, because it is easy to click a specific filter in and out. Be careful with how much high frequency you tone down since this can also remove the live feel to a recording.
3) Apply dynamics processing to achieve better balance between instruments and voices
Cool Edit Pro has an excellent Dynamics Processing effect. With some careful compression you can "pull" out a quiet solo voice against much louder accompaniment.
4) Apply any extra room reverb
Normally you don't need to do this step, but in the case of organ recitals you can make the organ appear as though it was in a magnificent cathedral. If the live performance was in a "dull" room, you can add some artificial room reverb, but do it carefully and double check on headphones and studio monitors that it doesn't sound phoney!
5) Rebalance left and right to widen or narrow the stereo image
You can use this step to create a more rounded sound for large choruses. Compare between headphones and studio monitors to ensure you haven't made the image too wide or turned it into mono!
6) Normalize the maximum sound level
There's nothing more annoying when you listen to your finished CD then to find that one track is much louder or softer than the rest. Normalize every track 85% of maximum. Why 85%? It's because some (cheap) CD players can not handle dynamic sonic "bangs" very well.
7) Trim the start and end of the track
Cool Edit Pro allows you to zoom into the start of the WAV file. Highlight the section before the music program starts and delete. Go to the end of the track and highlight 3 to 5 seconds. Use the Envelope effect to taper down to zero by listening to the preview to hear the effect of the decay.
Now save your work as a new WAV file!
